


Creating bespoke custom plushies is part art, part engineering. On the soft, textural cloth, the colors must appear correct. Blown details on embroidery should be adorable at close range and sharp at a distance. And the entire toy must survive hugs, drops, and the every now and then irresistible laundry day. I have worked in plush design, helping brands, artists, and student makers produce their plush ideas, over a decade, and color selection and stitching regulations make up most of your quality in the end: 80% of it. This guide will synthesize those lessons into actionable steps that you can take, no matter whether you are making a limited run that you can sell to your fans or a class project on the cheap.
Why Color and Embroidery Plays An Important Role in Plush
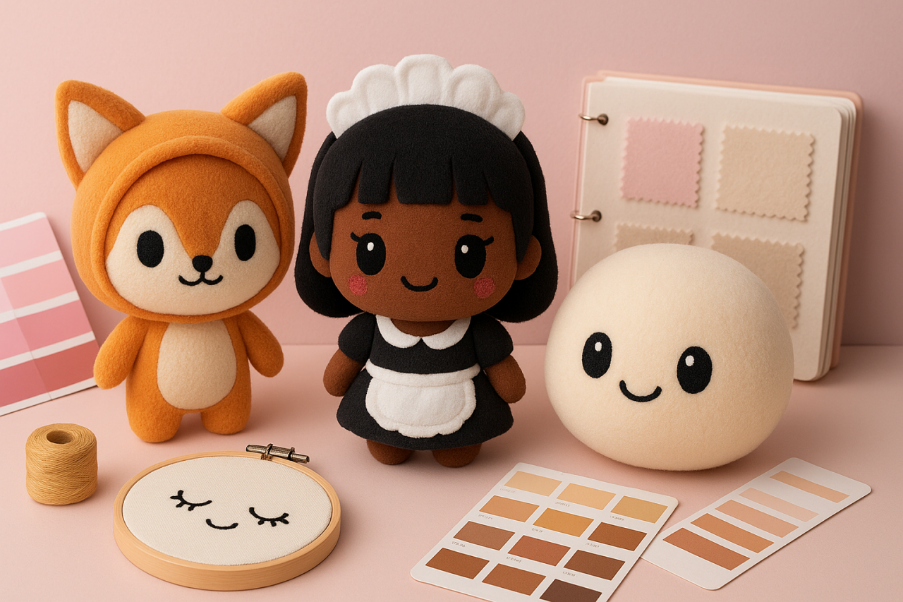
My color will sell my line; my embroidery will add character. A plush color scheme tells you not only about mood and appeal but also about personality due to the stitched eyes, mouths, and badges. When either is out of alignment–distorted colors on screen to cloth; puckered areas in stitches; tiny letters smear–you lose time and money correcting the down-stream complications. These two pillars and your soft toy will instantly be premium-looking.
Custom Plushies Color Foundations
Select a Purposely Palette
Begin with a narrow palette: a primary color, a secondary color, and two accents. This gives the procurement a clean status and avoids the almost perfect matches in fabric, embroidery thread, and printed labels. In case of projects that depend on the brand, match with the swatches that exist; and with character plushies, make the face color and eye piece the most dominant, and balance out the body and extras.
Apply Color Psychology in Moderation (Wisely)
Friendly and intimate, warm colors such as peach, coral, and pastel yellow are read. Mint, sky, and lavender are cool colors that are trendy and have a serene effect. Pastels are collectible and designer; high-saturation primaries are younger and playful. In my studio, replacing a bright clear red with a subdued tomato turned what had been a plush in the kid aisle to a plush in the lifestyle collectible aisle.
Give Space with Neutrals and Shading
Without printing gradients, a basic color can be proposed by combining a deeper shade of the same family in ears, paws, or belly panels. Neutrals (cream, warmer gray, and charcoal) are a good balance to saturated palettes and make faces stand out without a rough ridge.
Take a screen and stitch it: getting real-life colors to match:
Learn Color Spaces
Art begins with RGB, printers work with CMYK, threads exist in their own colour specifications, and fabrics are in ready-dyed colour sets. Expect translation. When choosing colors on the screen, you should be ready to test them in reality with the help of fabric color cards and thread cards. The Golden rule: release colour in the same medium that will be shipped.
Thread and Fabric Swatch Books
See your supplier about having physical swatch books of minky/fleece/felt and thread charts provided by their embroidery vendors. Use screenshots only in choosing the nearest physical matches. Dye lots Thread and fabric are manufactured in dye lots; they may be a little different. To minimize surprises, put the actual vendor document approval codes on your spec sheet.
Control of Light and Metamerism
That plush might appear different in daylight and office fluorescent light and warm retail spotlights. Examine swatches under at least two light settings. If being strict is your thing, strive to be visually indistinguishable between the lights; in manufacturing jargon, a 76-ΔE is generally ok, and accept what you see rather than what the computer tells you.
Soft Fabrics are expected to get darker Shades of Colors
Pile and nap are absorbent of light, which renders the colors a little darker than on a flat picture. Pale pastels are liable to become invisible and dark shades to engulf detail. Should a hue need to be airy, put it a degree paler than you imagine you require on your wallet regarding choice.
The Colour Depends on Fabric varieties More Than you Imagine
Pile, Nap, and Texture
Minky and plush fleece are reflective and fluffy. Their resting condition introduces subtle two-tone variations by direction of stroke. Brush nap in one direction before cutting patterns in order to ensure panels will appear the same. Short-pile minky displays embroidery on a better level than shaggy fabric. Felt and velour provide flatter (more correct) color but are not as cuddly.
Washing and Colorfastness
Request colorfastness to washing, saliva/sweat, and rubbing ratings of the vendors. Hands touch plushies, mouths do also; cheap dyes can leak into lighter textiles, or into whites used in embroidery. Where children are your target audience, select materials that comply with toy safety regulations in your target market and make any care restrictions on your spec.
Repeatability rather than Perfection
It is more desirable to select a fabric shade that is 95 percent perfect and widely scalable in the dye lot than to find the exact custom dye which is just perfect once and difficult to replicate. Most plush programs have to be consistent rather than perfect once a year.
What to Embroider vs. Applique vs. Print
Embroidery (Most suited to Faces and Line Work)
Eyes, eyelashes, eyebrows, smiles, freckles, whiskers, logos in thin lines, and simple pictograms are the best things to embroider. Light is reflected differently in threads when compared with fabric thereby creating a vibrant, high-quality appearance to facial detail. Embroidery is sturdy yet the most secure to mitigate user damage on the part of young users as there are no sharp pieces that can detach.
Applique (Best when Colour Blocks are large)
To get a large contrast shape, such as a heart tummy, badge or patch, apply one bit more of the fabric and tack it in a satin stitch margin. This avoids compact-overfills (which stiffen with fills) and makes store plush pliable.
Print (Optimal with the Gradients and the Small Multicolor Art)
On appropriate fabrics, sublimation or transfer prints can be used even with painterly gradients or with very small multicolor art involving many hues. Print in places that do not require extreme fuzziness or touching on a regular basis or fuse with embroidered outlines to be sharp.
The Rules of Embroidery That Save Your Plush (Kid, Every Time)
Minimum Sizes and Line Weights
The tiny stitches would be mucky on fluff. These are practical minimums to respect:
- Small text size: 5-6 mm and easy block font in satin stitch. Take 78 mm in case the material is excessively bushy.
- Line thickness: The minimum thickness of the satin/reasonable line is ~1 mm; the thickness of 1.2 1.5 mm would be cleaner.
- Dot elements (freckles or sparkles): 1.5-2 and above mm diameter so they do not sink in the pile.
- In case of going thinner it can be done in a bean stitch (triple-run) instead of super-narrow satin.
Select the Appropriate Type of Stitches
- Satin stitch: Shiny, dimensional, works well on outlines, text and up to ~8-10 mm in width.
- Fill (tatami) stitch:The matte texture covers the bigger forms, but it is not a brick.
- Running/bean stitch: Modest decoration, useful in super fine lines or loose appearance.
The combination of satin for edges and fill in the interior makes art jovial and assists in limiting puckering.
Dial In Density plus Underlay
Density: This is too dense = stiff, puckered; this is too light = fabric color shows through. An average beginning setting for fill is approximately 0.40 mm spacing of the stitches; vary according to fluff of the fabric.
Underlay: Stabilize with an edge-walk and a little zig-zag, then stitch on top. Underlay tack the pile down to ensure the details do not evaporate.
Compensate Push and Pull
Embroidery stitches squish and pull on fabric. Pull compensation expands strokes a little and has them end at the desired width, and push compensation shortens tall satin columns to prevent ends ballooning. Good digitizing preempts this, particularly in the areas of circular eyes and small serifs.
Superposition of Order and Registration
Lighter sew on first, foundations, and then darker outlines. Before the border satins are tacked down are the appliqued fabrics. With multi-part faces, stitch whites, followed by colored irises, followed by black pupils, followed by highlights. This arrangement conceals edges and maintains edges sharp.
Stabilizers and Hooping
To avoid distortion and stay soft plush use a cut-away stabilizer. Tear-away may be scratchy or flimsy. To achieve the softest possible finishing many factories now place a thin tricot lining on the back of the embroidery inside the panel before stuffing so the stitches have no actual feel of thread backs on the softness of the material.
Safety and Feel Faces
Embroidered eyes and noses are more secure than tough parts. In case the target audience is small children, it is better to exclude rhinestones or unfastened bows on the face. Curvature in the round corner rather than sharp shape at the mouth as this tends to snag making it dented.
Devising Your Artwork to Manufacture
Begin with Clean Vector Art
Train your vector art to master quality to allow the ease and purity of scaling and modifying isolated shapes by your digitizer. Reduce effects to shapes such as blurs or shadow- reductions- to shapes- embroidery does not do alpha, it does stitches. Define a layer of callout in color to indicate every face component and preferred shade of thread.
Show a Color Callout Sheet
Add photos of swatches of selected colors of fabric and thread codes. Trade the order of stitching, plus any applique former textures of fabrics. Including comments such as matte look is preferred or slightly glossy highlights will be ok so that the digitizer will understand what you need.
OK a PPS ( Pre-Production Sample )
Always have a stitched sample favouring your absolutely correct fabric, and go in the correct nap direction. Where possible, review two light situations and take photos in each one. Edge, spacing, with small pieces, check, hold. Check the left and right sides of the plush: symmetry problems are more likely to be located in mirror shapes.
Record An Image of What is Good
Fig. Inside your spec add images of approval lines: OK fuzz on edges, OK spot highlight position, and eye sparkles OK spot 2 mm inside edge. Clearly labeled pictures make the job quicker in the case of a new batch 6 months later.
Universal Color and Embroidery Issues (and Quick Solutions)
Colours Are Less Bright Than Your Art
In a soft pile there is less contrast. Tweak the contrast of your palette a little by selecting a brighter ground and a darker highlight. Your key outlines should be in satin to give definition and sparkle, rather than matte fill.
Subtle Details are Embedded into the Materials
Make lines thicker 1.2-1.5 mm and underlay denser, and plan to cut the nap down a bit in small areas prior to stitching (most plants can perform controlled cuts). Whiskers or lashes of bean stitch rather than ultrathin satin.
Puckering Around areas of filling
Reduce stitch density and add some suitable underlay and ensure the stabilizer is cut-away and thoroughly hooped. A single large fill should be broken into two or three sections with staggering of the stitch you are working on to lessen the stress.
Misregistration Across the Colors
Change the order so stitches as soon as possible outlines stitch last, phase jump distances and approach a minor overlap between congruent fills. Good digitizing will put in bogus digitizing to keep invisible color variations invisible.
Price, lead time, and the Influence of color/embroidery on them
The complexity is driven by Color Count
Every new shade of fabric or thread color causes sourcing and machine changeovers. Consolidate near-duplicates. In a case where two accents differ by only a shade, use the one that prints or stitches better and repeat throughout the design.
Price and Feel are influenced by Stitch Count
Full fills are fills with added stitches and minutes. Use appliquiska panels instead of large areas of fill where this is possible. Limit it to high-density stitches only on the face and brand marks and leave the rest less to save on budget and squishiness.
Your Best Investment is Samples
A single, well- iterated pre-production sample avoids costly re-work of an entire run. Leave yourself a minimum of one round of revisions; that is where it is the cheapest to make color and embroidery corrections.
Practical and Sustainable Decisions
In case sustainability is important to your project, inquire about recycled polyester minky, low-impact dyes and vendors of certified thread. It will give you a bit different hand feel, and a narrower range of color, but most programs get superb results particularly in neutral, nature inspired color palettes. An added bonus to the embroidered faces is that there are no plastic components.
Reflow A Fast, Proven Workflow That You can Reuse
- Establish a narrow color story and mood of the audience.
- Choose the actual color of the fabric and thread using sample fabrics.
- Put together vector art with labeled layers and stitch order notes.
- Digitize with specific rules of density, underlay and compensation.
- Sign off a sample of a stitched piece in two different lights on the fabric.
- Photo documents the approvals and use exact codes so you can replicate.
This cycle allows you repetitive, high-end-quality custom plushies per-batch production.
Conclusion: Smart color and stitch decisions are the key to starting a Premium Plush
Custom plushies do not occur by chance. They are the products of a progression of considered design decisions, a controlled color set that stands up to conversion to fabric, card selections of threads and colors and an embroidery computerization process that accommodates minimum sizes, densities and compensation. By making color and stitching part of the engineering in your problem and taking that upfront, your plush is cutely awesome now, and wears well after 100 hugs.
And when developing an entire line of products, make a graph of colors/embroidery designs that you can fall back on to use across characters. It can make your collection read together, saves time when you sample, and minimizes waste. And when you are making your very first plush, make it small and experiment with the face and learn more with that one sample than you would do with a dozen mock ups.
FAQs
How can I safely embroider eyes and facial detail on custom plushies?
The safest embroidered eyes and facial features are those that do not contain hard objects that may come off. They even age and retain their shape after much handling and washing, particularly as they are stitched with a good underlay and cut-away stabiliser.
Why are my colors different on screen than on fabric?
Light is projected in screens; it is reflected in fabric. The color spaces also vary and the plush pile darkens colors. Whenever possible, select production samples: physical fabric and thread swatches, and when possible approve a stitched sample in a representative fabric swatch under various lights.
Minintimes, what is the smallest amount of text/outlines that can be done in embroidery on plush?
In satin-stitched text, a simple font is ideal, and achieves a minimum of 56mm height, and 1.2mm roughly in line thickness. Very fine lines are preferably done with a bean stitch rather than with the ultra-fine satin, and upon fuzzy materials.
What can I do to avoid puckering in stitched spots?
Reduce stitch density a little, insert correct underlay, apply cut-away stabilizer and hinge solidly. Fabric stress is also lowered by cutting the large fills into blocks of different stitch angles.
How can I record color so that I can reorder it?
Obtain precise codes of the vendor of fabric and thread, attach labeled photos of your approved sample and keep it along with your digitized files of embroidery. Make notes about lighting conditions and the final sequence stitching to allow new batches to be identical to the first.